how-to

Everything Is About Narwhals: Finding Inspiration & Working with Creativity

This is a long overdue post. I get asked a lot what I am reading, how I work and where to find inspiration. I hope this post will be a road-map for you to discover your own inspiration and finding your own creative path. First, let us travel back to my childhood in Denmark. I grew up in a small town of roughly 3,000 people and I loved our local library. My favourite section was what the local library classification system (DK5) called the "00-07 section: General Works" - a grab bag of encyclopedia, books about books, interdisciplinary books etc. As a child, I'd walk in, pull down a few books and sit in a chair reading until my mum returned from the shops. It was a scattershot approach but it led me to different sections I never would have discovered otherwise. I learned about Roman slaves, costume history, parapsychology (hey, section 14 was just the next book case along) and so forth.

I've spent some time thinking about this in the context of ebooks & digital downloads (which I adore). I love being able to walk over to my book shelves and discover a paragraph about historical knitting, domestic work, or even a technical run-down of various cast-ons. I crave context and knowledge. I relish discovering new ideas simply by picking up a random book.  I am a big fan of owning physical (knitting) books - that chance of discovery is priceless.

All if this is written from the perspective of someone who works with knitting professionally on a full-time basis. I realise I am writing this from a privileged perspective (and as someone who does not mind a cluttered home).

What do you do if this is not your reality? Let's take a look at the general principles of everything is about narwhals.

  1. Chance: Start by opening a random book,  or typing in a random word into Google Image Search, or walking down a street you don't know.
  2. Open Your Eyes, Ears & Mind: what is interesting? what captures your imagination? what is different? what is new? what is awesome?
  3. Document. Keep a commonplace book; use Evernote (making sure to tag), take photos, draw and doodle.
  4. Everything is About Narwhals. Suddenly you will notice the same thing everywhere: you'll see the same motif recurring or the same ideas propping up in all sorts of places. If you get interested in narwhals along the way, suddenly you'll realise everything is about narwhals.
  5. Begin Your Creative Project. You'll have your scattershot notes, your own sources, your own documentation and your own story. How does it all fit together?
  6. Make stuff! And hopefully share it with the world because the world needs creative people.

narwhal-clip-art-narwhal_facts_by_chibiwolf1005-d38o5rq

Narwhal by chibiwolf1005

Obviously not everything is about narwhals, but it is a neat way of explaining how creativity works for me. To couch in more high-brow terms, my creative work is synthetic (derived from Greek "synthesis":  'with' + 'placement' - σύνθεσις). I work my way to a coherent idea by placing many ideas together and then I find out what happens. 

So, while I can tell you what I am reading and I share photos on Instagram of amazing things I see, the really important thing is that you go out and find your narwhals.

Let's look closer at steps 5 and 6 above.

5. Begin Your Creative Project: you have your narwhal idea, you also have scraps of paper, doodles, and maybe even a Pinterest mood board (here's a random one of mine). This is the point where you sit down and try to make sense of it all.

  • Do you have a colour scheme?
  • Do you have recurrent motifs?
  • Do you have stories you want to tell?
  • How do you want to communicate your ideas?

This is when you start sketching or writing. Remember you are currently working to put things together and you are working your way towards a project. Do not be afraid of commit ideas to paper because you are not making final decisions. Just play and combine.

6. Make Stuff: you have your big idea ready to go and you know the colour/motifs/story. This is the time to create your beautiful piece.So, sit down and make it. Take ownership of it as well because it could not have come into being without you. You rock.

Addendum: I occasionally teach classes on designing, creativity and how to move from vague ideas to full-blown project. Keep an eye on my workshop schedule if you are interested.

Tutorial: Lace Charts 4 - Chart Tricks & Knitting Hacks

I like my patterns to be inclusive, so I try to offer them with both written and charted instructions. However, sometimes (like the Mahy shawl) a chart is the best way of offering concise and precise information. I know many people don’t like charts, but I hope this series of tutorials will go some way to demystify charts and explain how to use them.  This instalment is all about my favourite lace chart hacks. I like to knit lace wherever I go (my favourite being pub knitting) and over the years I've picked some some tricks that I hope will come in useful. If this is the first post in the series, I suggest you go back and start with Tutorial 1, as I'll be discussing some of the things we've covered earlier.

Let's look at a shawl chart which has a repeat.

Shawl Repeat

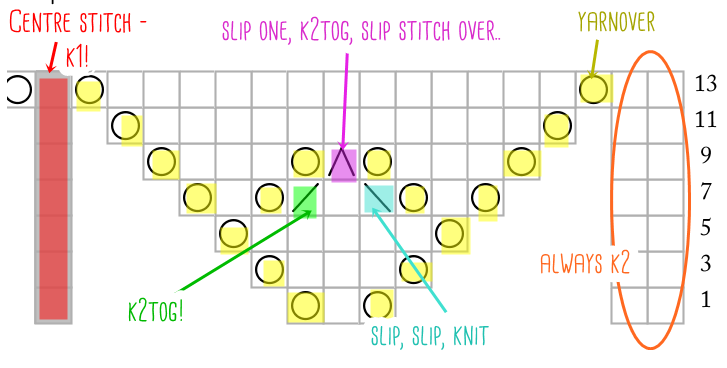
By now this should not look too daunting. You have the row numbers, you know what comes after the centre stitch and this should knit up fine on first repeat, yes? But what if you have to work this chart 10 times? How would you feel about it then?

Problem 1: "I find working repeats really difficult. I never have the right number of stitches at the end of a row".

I hear you. Let's look at it closer.

Shawl Repeat_startfinish

Part of the problem is that you may think each square represents a stitch - so you should have three stitches left at the end of row 1. As we discussed previously, thinking of a square as a stitch is wrong. Remember: each square represents an action - in this case you are asked to work a yarn-over, an ssk and a yarn-over before you work the centre stitch. In fact, that means, you only have two stitches left over when you finish your repeat because you create yarn-overs out of thin air (so to speak) - the two stitches from which you make an ssk.

Solution 1a: look at the chart to see how many actual stitches you should be left with at the end of working all the pattern repeats.

Another possible explanation may be that you forget you are supposed to have edge stitches left at the end of the row. So, instead of having the supposed two stitches when you finish the chart, you may have four stitches.

Solution 1b: remember you have edge stitches left at the end of the row. Place stitch markers to indicate when you start/finish working the edge stitches. 

Problem 2: "I find working repeats really hard. I tend to get lost and never know where I am!"

Solution 2a: Stitch markers are your friends. Place them to outline each repeat. Sometimes you need to be careful as stitch markers may shift slightly (especially if repeats begin or end with yarn-overs). However, as long as you are vigilant, stitch markers are your best friends.

Solution 2b: Don't forget to count! Look at the chart - the repeat is worked over 10 stitches, so keep that number in your head as you work. Keep working in batches of 10 stitches, so you always start at the beginning of the repeat whenever you pick up your knitting.

Solution 2c: This is an extension of Solution 2b, but it's my favourite hack. Think of repeats as clusters of actions. You need to execute ten actions - that is one cluster. This is where lace knitting gets almost meditative: just work these ten actions over and over (or however many actions your chart calls for). Imagine if everything in life was as simple as working these ten actions over and over. Ah, sink into those clusters... you may even be able to break that 10-action cluster into even smaller clusters - on Row 7, for instance, you knit 3 stitches, work a yarn-over, then an sk2p, and a yarn-over, followed by four knit stitches. In my head I'd translate that into two clusters: "knit 7 cluster, work action cluster" - and I'd remember I'd need to end with two stitches at the end - at which point I'd do a yarn-over, an ssk, and a yarnover.

Now. There is something I hear again and again:

Problem 3: "When I use a chart, I get lost in the symbols and I lose my place immediately."

This is where stationery comes in handy. Allow me to demonstrate using a very familiar chart.

Basic Chart_no WS_highlighter

Solution 3a: grab your highlighters and assign a colour to each symbol (you may want to photocopy your chart if you are working from a book). Some people just find chart symbols really confusing and respond a lot better to colours. You'd be amazed what a difference it makes to some people - give it a go as you may be one!

Solution 3b: Grab some big post-it notes. Place them above and below the row you are currently working on. Scribble extensive notes on the post-it notes. This filters out all unnecessary information and leaves you to focus.

Basic Chart_no WS_post_it

Solution 3c: And don't forget to tick off rows as you've worked them!

Problem 4: "I am afraid of making mistakes and then having to rip out my knitting because lace is really hard to pick back up!"

Don't worry, everybody makes mistakes. Fortunately fixing your knitting is much, much easier to do than you think. I like to think as lace knitting as almost-free therapy: I cannot fix everything in my life, but I can fix my knitting in a matter of minutes! Also, please don't think of mistakes as bad things - I love making mistakes because I know it makes me a better knitter!

Solution 4a: if you've missed a yarn-over in the row below, don't pull out the entire row. This is a great YT video by Paula of the Knitting Pipeline podcast that shows you how to fix it easily.

Solution 4b: Lifelines are great. Once you've finished a successful repeat of a chart (say, the set-up chart), insert a lifeline so you know you can rip back to this sweet spot where everything's right. If you make a mistakes the stitches will stop falling at this stage, you can pick up all the stitches and get back to knitting. You are working a particularly complex chart, you may want to insert a lifeline a bit more often - just make sure you know where you've inserted the lifeline and don't confuse yourself with having fifteen lifelines in one shawl. Keep it simple! This is a really useful YT video showing just how to insert a lifeline and how to use it.

One of the best hacks I know is to take some dental floss and insert it into the tiny hole on my interchangeable needle - that way I can insert a lifeline as I am knitting. This is particularly useful if there's a RS row in the pattern where it's all knitting with no stitch pattern (like Row 9 of the Shawl Chart with Repeat I showed you earlier).

Problem 5: "Charts are really small and I have trouble telling the symbols apart. It takes all the fun out of knitting if I have to keep staring at tiny squares!"

I am a low-tech girl and yet I find modern technology really helps me out here.

Solution 5a: If you are knitting from a PDF, your device of choice can zoom in  and out. Consult your manual to see how it's done as it differs from device to device.

Solution 5b: if you are working from a printed book or magazine, you can enlarge the chart using a photo copier (many modern printers come with a scanner/copier that will let you do it from the comfort of your own home - otherwise you can do it at the library or ask at work if it's okay to enlarge a chart using the office equipment). By enlarging the chart you can also really go to town with highlighters and scribbled notes!

I hope you've enjoyed this four-part series of lace chart tutorials.

Lace Charts 1 – The Anatomy of a Lace Chart Lace Charts 2 – How to Read a Basic Chart Lace Charts 3 – How to Read a Shawl Chart Lace Charts 4 - Chart Tricks & Knitting Hacks

Thank you! Kx


Tutorial: Lace Charts 3 - How to Read a Shawl Chart

I like my patterns to be inclusive, so I try to offer them with both written and charted instructions. However, sometimes (like the Mahy shawl) a chart is the best way of offering concise and precise information. I know many people don’t like charts, but I hope this series of tutorials will go some way to demystify charts and explain how to use them.  So, we've had a look at the anatomy of a lace chart and how to read a basic chart. Today I'll take a look at a slightly more complex chart that adds extra stitches as well as mysterious "no stitches".

Lace Chart_no_WS

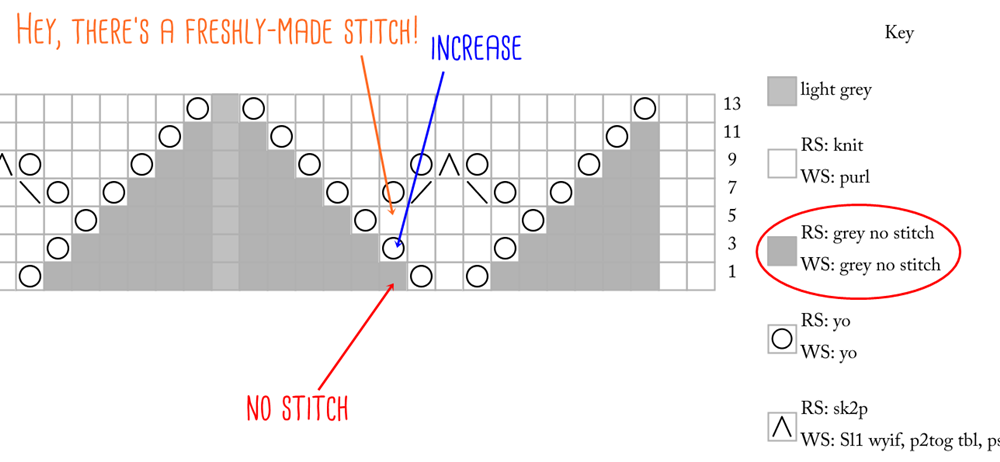
We had a look at this in the first tutorial. But there was one thing I left out that you may or may not have seen in charts: "No Stitch" symbols. Basic Chart_no WS_hiddenitemsshown

The "No Stitch" symbol is inserted because charts are essentially a 2D grid of a 3D object. Because we make stitches in that position later on, we need the grid to reflect that. To wit:

Basic Chart_no WS_hiddenitemsshown_explanation

I like to hide "No Stitch" squares in my chart because I find they cause more confusion than they are worth. As a knitter, all you need to know is that these "No Stitch" squares are actions that do not exist yet. Skip them. You are yet to make them.

So, let's go back to the lace chart where the "No Stitch" squares have all vanished into thin air. Let's figure out how to follow this one.

Lace Chart_no_WS

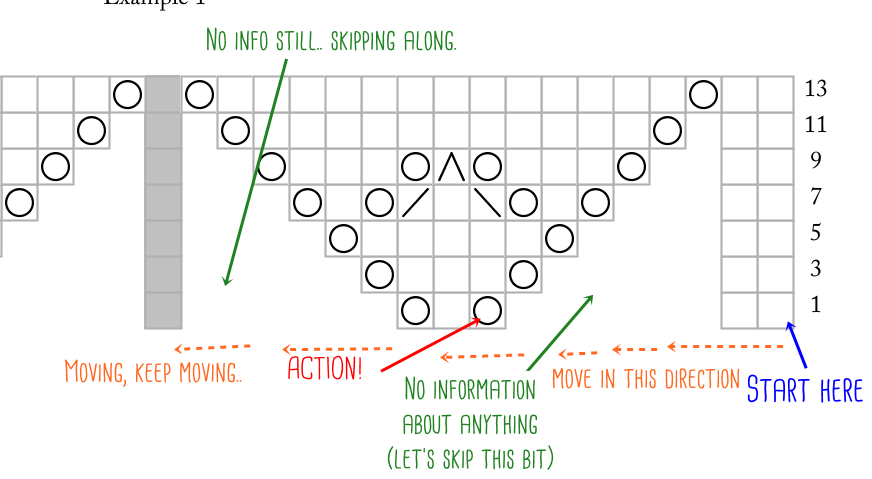
Step 1: Look for the row number. You start with Row 1. Step 2: Work in the direction you are working the stitches. On RS rows, work from right to left. On WS rows, work from left to right. Step 3: Each square represents an action you must take. Mostly you end up with a single stitch on your needle as the result of your action, but keep checking your chart key for information! Step 4: If you cannot see a square or if the square is indication as "No Stitch", you skip to the next action you can see. Step 5: If information isn't visible (i.e. you cannot see WS rows on the chart), check the pattern for instructions.

Keeping all this in mind, you might start looking at the chart like this: Basic Chart_no WS_reading

This post is part of my Lace Chart tutorial series:

Lace Charts 1 – The Anatomy of a Lace Chart Lace Charts 2 – How to Read a Basic Chart Lace Charts 3 - How to Read a Shawl Chart Lace Charts 4: Chart Tricks & Knitting Hacks

Next time we will look at chart comprehension hacks and how to customise your charts. That will be the last chapter, so keep your questions coming either here or via social media. Kx


Tutorial: Lace Charts 2 - How to Read a Basic Chart

I like my patterns to be inclusive, so I try to offer them with both written and charted instructions. However, sometimes (like the Mahy shawl) a chart is the best way of offering concise and precise information. I know many people don’t like charts, but I hope this series of tutorials will go some way to demystify charts and explain how to use them.  This post is about how to read a basic chart. The chart is very straightforward - no shaping and no extra stitches being added. If you like this stitch pattern, you may enjoy my Florence scarf (it's free and only takes one ball of fluffy yarn).

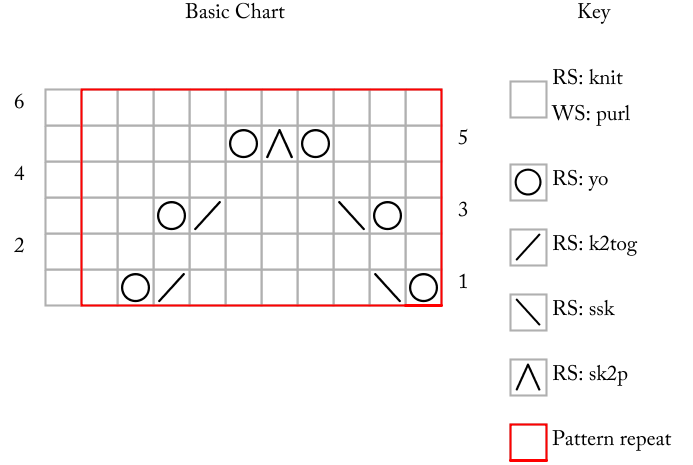
Basic Chart

Reading a chart can be really daunting. Unfortunately chart symbols are not standardised and so you need a key which explains what the various symbols mean. Always check the key to make sure you know what the symbols mean. 

Tip: If you find it hard to remember what the various symbols mean, or if you keep mixing up two symbols, make a copy of the chart and assign a colour to each symbol. Grab highlighter pens and start colouring in the chart. It's a nice little brain-hack.

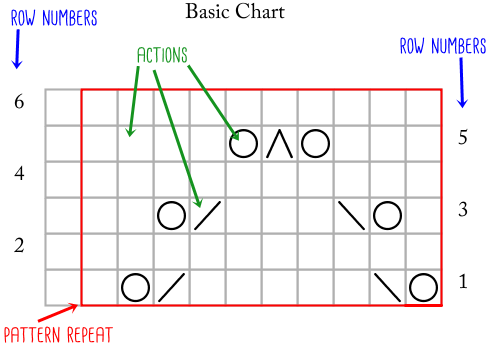
Basic Chart_actionsand layout

Now let's look at the chart itself.

Row numbers are important because they tell you which is the RS and the WS rows. RS rows have numbers on the right-hand side. WS rows have numbers on the left-hand side. We'll come back to why this is important in just a second!

Pattern repeats are outlined. Normally the outline is red, but you may come across a fat, black line being used if the pattern is provided in black & white. The outline is exactly the same as the repeat from *.. you are used to from written instructions. In this case, you can see this is a 10-stitch/6-row repeat. You repeat the ten stitches over and over, until you finish with one stitch (the one outside the repeat).

Action is how I think of a square in a lace chart. Each square represents an action you must take when you get to that stage. Many people think that each square represents a stitch, but sometimes you work more than one stitch per square or do not work a stitch at all. A right-slating line means you are knitting two stitches together; a V (not represented) typically means you are slipping a stitch from one needle to another.

When you work a lace chart, you move from one action to another. One of the biggest advantages of a chart is that it shows you how actions stack on top of one another, creating a stitch pattern. The visual mimicry of the chart symbols often mean your fabric will resemble the chart!

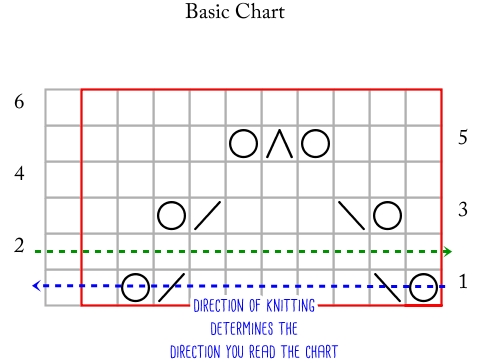
basic chart_direction

The two biggest problems of reading a lace chart is A) where to start and B) how to know which direction you read the actions. Many people think you start by reading a chart like you'd read a piece of English-languaged text: top left and reading left to right. This is incorrect. And this is where we go back to talking about row numbers because row numbers are your friends.

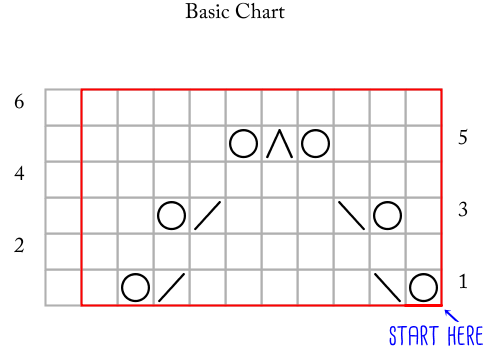
A chart mimics the knitted fabric and your first row will therefore always be at the very bottom. The row number shows that you start at the right-hand side and work your way left. This corresponds with how you work the stitches too: you move your stitches from the left-hand needle to the right-hand needle. When you work the WS rows, you will have turned your work, so you need to turn/revert the direction in which you are reading the actions. Again, the row numbers are your anchors as they will show you where the given row starts!

So in short:

Basic Chart_starthere

This post is part of my Lace Chart tutorials.

Lace Charts 1 - The Anatomy of a Lace Chart. Lace Charts 2 - How to Read a Basic Chart Lace Charts 3 - How to Read a Shawl Chart Lace Charts 4: Chart Tricks & Knitting Hacks

Hope you found this useful! Next time we'll be looking at how to deal with 'no stitches', shaping, and how to customise your lace chart reading. As always, comments and questions are welcome! Kx

Tutorial: Lace Charts 1 - The Anatomy of a Lace Chart

I like my patterns to be inclusive, so I try to offer them with both written and charted instructions. However, sometimes (like the Mahy shawl) a chart is the best way of offering concise and precise information. I know many people don't like charts, but I hope this series of tutorials will go some way to demystify charts and explain how to use them.  This first post is about the anatomy of a lace chart and what decisions go into making a chart as easy to read & use as possible.

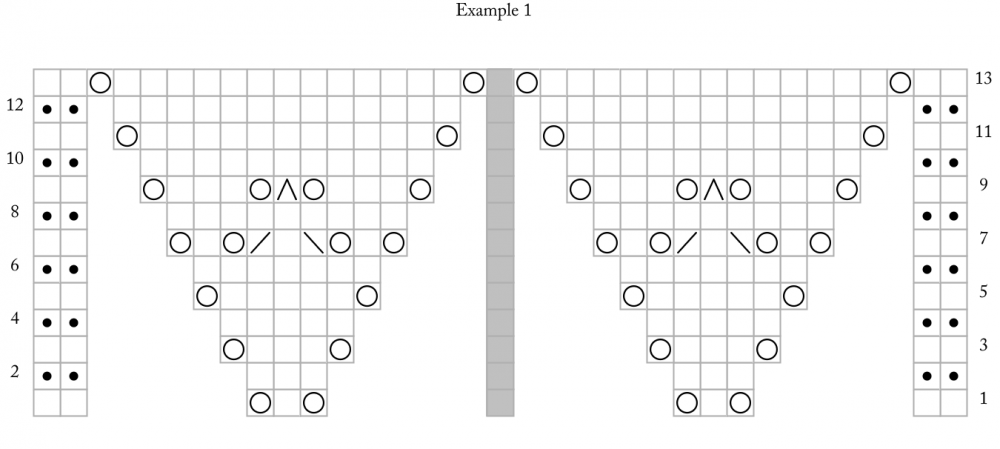
Here's a mock-up of a chart showing the beginning of a triangular shawl.

Lace Chart

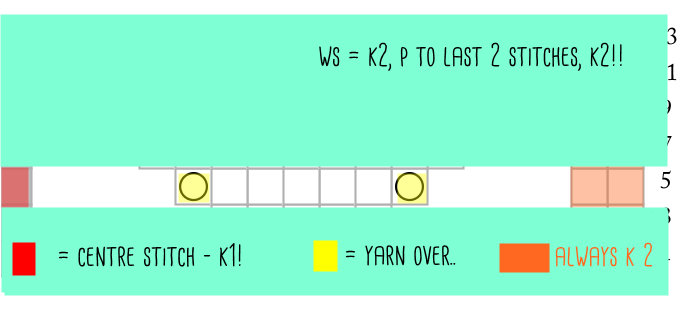
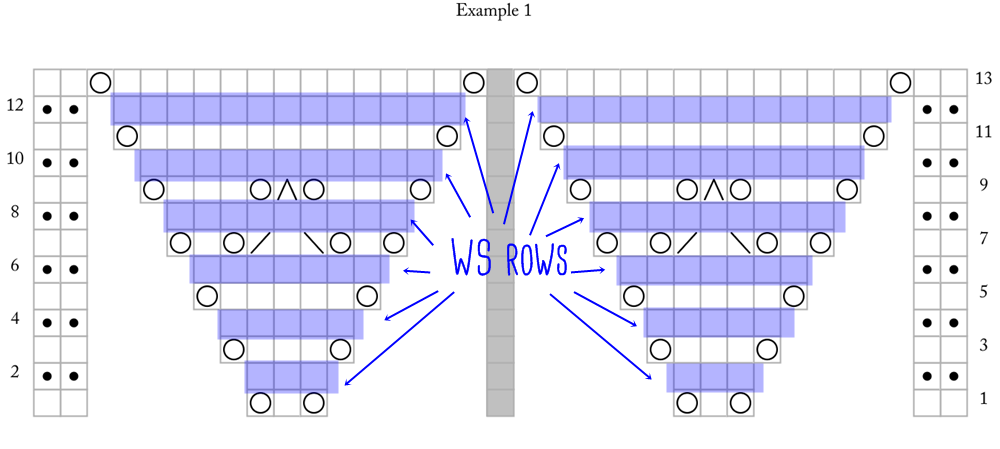
There is a lot of redundant information here. Look closely and you'll see that all the even-numbered rows are telling you to k2, purl across, k2. Those are the WS rows.

Lace Chart - annotated WS

To stop your eye being bombarded with repetitive and redundant information, these rows are hidden. I would then add a note to the pattern itself: "Work all WS rows as follow: k2, purl across, k2"

The chart would then look like this:

Lace Chart_no_WS

That's better. Without distracting WS rows that tells you the same thing again and again, it's far easier to see the odd-numbered rows (RS) where you will be working a pattern.  Hang on, there is more redundant information.

Lace Chart_no_WS_edgecentre

Due to the construction of a standard triangular shawl,  you are doing four things again and again. We've already discussed the first (WS rows), so let's look at the other three. The second thing you keep doing is knitting the first two stitches of every row. The third thing you do is to knit the centre stitch. The fourth thing is to knit the last two stitches of every row.

But there is a fifth instance of repetition in this chart. Have you spotted it?

Lace Chart_no_WS_edgecentreactionsThe chart has you repeating the same stitch patterns after the centre stitch (I will be writing more about this in a later instalment. Note that I am talking about actions in the image- in the next part I will share how you read a lace chart and we'll talk more about actions then).
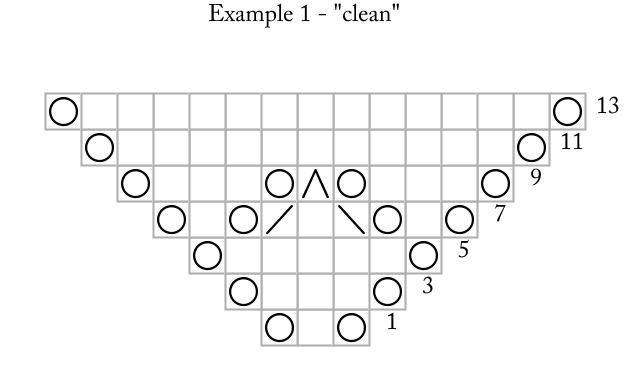
By now you will have twigged that I am a big fan of removing repetitive information. Some patterns work best if I keep the edge stitches, the centre stitch and the two sides of the lace chart - I find the edge stitches and the centre stitch particularly useful as anchors - but other patterns are so full of information, that I want to leave out all the repetitive actions. It depends upon who the pattern is aimed at - easy shawls will have more anchors and complex shawls far fewer.

And so for complex shawls I'd add in-depth notes:

  • Work all WS rows as follow: k2, purl across, k2
  • All rows begin and end with k2 (edge stitches)
  • Remember to work the centre stitch forming the spine between the two sides of the shawl.

And so the chart ends up looking like this:

Lace Chart_clean

This post is part of my Lace Chart tutorial series:

Lace Charts 1 - The Anatomy of a Lace Chart Lace Charts 2 - How to Read a Basic Chart Lace Charts 3: How to Read a Shawl Chart Lace Charts 4: Chart Tricks & Knitting Hacks

If you found this post complex, don't worry! We are going back to basics next time where I'll show you how to read a lace chart! As always, please do leave comments! Kx

Knitting Fancy: Stitch Primer

Fancy was the very first pattern to grab my attention of all the spring/summer previews. It is a deceptively intricate jumper knitted in Kidsilk Haze - I say 'deceptively' because once you twig how the stitch pattern works, the pattern is very straightforward. First of all, if you have knitted Laminaria, Echo Flowers or even Aurantium Blossom, then you will be more than comfortable knitting Fancy. Yes, boys and girls, this is an Estonian-style stitch pattern. Equally, if you are a relatively experienced crocheter as well as knitter, Fancy's stitch pattern will remind you quite a bit of making shells.

However, if you are neither a crocheter nor familiar with Estonian stitches, do not fret. It is just a matter of being able to read your knitting, feeling confident about dropping stitches and twigging when to do all those wrap-around the pattern asks you to do.

1) Get into a rhythm of counting 1-2-3-4-5. The stitch pattern is nothing more than a 6+1 pattern repeat and within that 6 stitch repeat you just need to count your cluster stitches. 1-2-3-4-5.

1a) On the second row of the pattern you will have a set of two purls right after one another. The first of these purls marks the end of your 6 stitch repeat and the second marks the beginning of your next repeat. Confused? I have a handy little graphic ready for you:

Fancy primer 1

(ETA: this graphic shows you how it looks from the right side. You'll be knitting this as a purl side, so either flip the graphic around in your head or read your knitting from the right side)

Basically you just need to remember your 1-2-3-4-5 rhythm. If you lose your way (which is easy on this row), you just need to look for your two purls side by side and you'll be as right as rain.

2) Once you have conquered that second row, you are laughing because what you have done so far will guide your way for the rest of the knit. On the third row you do your best Estonian needle dance - back and forth, back and forth - whilst count 1-2-3-4-5. I find it easiest if I match the placement of the wrap-arounds to the placement of the wrap-arounds on the second row. Cue another schmancy graphic!

fancy primer 2

I just find it easier to keep my place this way. Also, it'll help mirror your stitches neatly. At least that's what I tell myself.

3) And miraculously you are halfway through the stitch pattern around this stage. And this is where it gets really straightforward if you can read your knitting. Why? Here's why. The stitches line up!

fancy primer 3

As you can see, the next time you're doing your clusters, they'll line up on top of the previous rows in a manner that'll let you count 1-2-3-4-5. The third of your cluster stitches will be on top of that nice little stocking stitch line running below. Again, it's useful if you lose your way as you no longer have just the two purls side-by-side (as explained above) to keep you right: now you can also keep an eye on symmetry and make sure that you haven't inadvertently done six-stitch clusters etc.

And that is pretty much you sorted!

I would advise you to swatch the stitch pattern nigh obsessively in a non-sticky sportweight or DK yarn until you figure out how to do the stitches. Use correspondingly bigger needles as the cluster can be tight to work otherwise.

Final note on Fancy so far: I find that sizing does run large. I have gone down a size but you might find that going down a needle size works better for you.

Hope it helps prospective Fancy knitters. I'll post a proper photo of my progress so far later this week (no, the photo above is not my actual project).

Addendum: this is the nerdiest post I have ever written!