tutorial

Tutorial: Lace Charts 4 - Chart Tricks & Knitting Hacks

I like my patterns to be inclusive, so I try to offer them with both written and charted instructions. However, sometimes (like the Mahy shawl) a chart is the best way of offering concise and precise information. I know many people don’t like charts, but I hope this series of tutorials will go some way to demystify charts and explain how to use them.  This instalment is all about my favourite lace chart hacks. I like to knit lace wherever I go (my favourite being pub knitting) and over the years I've picked some some tricks that I hope will come in useful. If this is the first post in the series, I suggest you go back and start with Tutorial 1, as I'll be discussing some of the things we've covered earlier.

Let's look at a shawl chart which has a repeat.

Shawl Repeat

By now this should not look too daunting. You have the row numbers, you know what comes after the centre stitch and this should knit up fine on first repeat, yes? But what if you have to work this chart 10 times? How would you feel about it then?

Problem 1: "I find working repeats really difficult. I never have the right number of stitches at the end of a row".

I hear you. Let's look at it closer.

Shawl Repeat_startfinish

Part of the problem is that you may think each square represents a stitch - so you should have three stitches left at the end of row 1. As we discussed previously, thinking of a square as a stitch is wrong. Remember: each square represents an action - in this case you are asked to work a yarn-over, an ssk and a yarn-over before you work the centre stitch. In fact, that means, you only have two stitches left over when you finish your repeat because you create yarn-overs out of thin air (so to speak) - the two stitches from which you make an ssk.

Solution 1a: look at the chart to see how many actual stitches you should be left with at the end of working all the pattern repeats.

Another possible explanation may be that you forget you are supposed to have edge stitches left at the end of the row. So, instead of having the supposed two stitches when you finish the chart, you may have four stitches.

Solution 1b: remember you have edge stitches left at the end of the row. Place stitch markers to indicate when you start/finish working the edge stitches. 

Problem 2: "I find working repeats really hard. I tend to get lost and never know where I am!"

Solution 2a: Stitch markers are your friends. Place them to outline each repeat. Sometimes you need to be careful as stitch markers may shift slightly (especially if repeats begin or end with yarn-overs). However, as long as you are vigilant, stitch markers are your best friends.

Solution 2b: Don't forget to count! Look at the chart - the repeat is worked over 10 stitches, so keep that number in your head as you work. Keep working in batches of 10 stitches, so you always start at the beginning of the repeat whenever you pick up your knitting.

Solution 2c: This is an extension of Solution 2b, but it's my favourite hack. Think of repeats as clusters of actions. You need to execute ten actions - that is one cluster. This is where lace knitting gets almost meditative: just work these ten actions over and over (or however many actions your chart calls for). Imagine if everything in life was as simple as working these ten actions over and over. Ah, sink into those clusters... you may even be able to break that 10-action cluster into even smaller clusters - on Row 7, for instance, you knit 3 stitches, work a yarn-over, then an sk2p, and a yarn-over, followed by four knit stitches. In my head I'd translate that into two clusters: "knit 7 cluster, work action cluster" - and I'd remember I'd need to end with two stitches at the end - at which point I'd do a yarn-over, an ssk, and a yarnover.

Now. There is something I hear again and again:

Problem 3: "When I use a chart, I get lost in the symbols and I lose my place immediately."

This is where stationery comes in handy. Allow me to demonstrate using a very familiar chart.
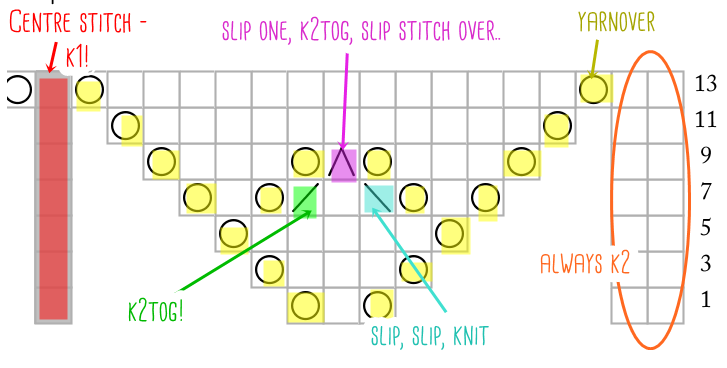
Basic Chart_no WS_highlighter

Solution 3a: grab your highlighters and assign a colour to each symbol (you may want to photocopy your chart if you are working from a book). Some people just find chart symbols really confusing and respond a lot better to colours. You'd be amazed what a difference it makes to some people - give it a go as you may be one!

Solution 3b: Grab some big post-it notes. Place them above and below the row you are currently working on. Scribble extensive notes on the post-it notes. This filters out all unnecessary information and leaves you to focus.
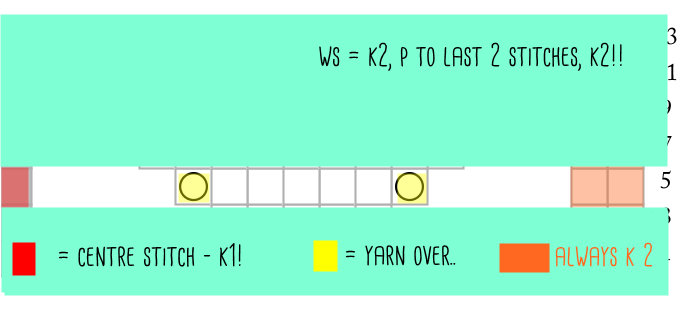
Basic Chart_no WS_post_it

Solution 3c: And don't forget to tick off rows as you've worked them!

Problem 4: "I am afraid of making mistakes and then having to rip out my knitting because lace is really hard to pick back up!"

Don't worry, everybody makes mistakes. Fortunately fixing your knitting is much, much easier to do than you think. I like to think as lace knitting as almost-free therapy: I cannot fix everything in my life, but I can fix my knitting in a matter of minutes! Also, please don't think of mistakes as bad things - I love making mistakes because I know it makes me a better knitter!

Solution 4a: if you've missed a yarn-over in the row below, don't pull out the entire row. This is a great YT video by Paula of the Knitting Pipeline podcast that shows you how to fix it easily.

Solution 4b: Lifelines are great. Once you've finished a successful repeat of a chart (say, the set-up chart), insert a lifeline so you know you can rip back to this sweet spot where everything's right. If you make a mistakes the stitches will stop falling at this stage, you can pick up all the stitches and get back to knitting. You are working a particularly complex chart, you may want to insert a lifeline a bit more often - just make sure you know where you've inserted the lifeline and don't confuse yourself with having fifteen lifelines in one shawl. Keep it simple! This is a really useful YT video showing just how to insert a lifeline and how to use it.

One of the best hacks I know is to take some dental floss and insert it into the tiny hole on my interchangeable needle - that way I can insert a lifeline as I am knitting. This is particularly useful if there's a RS row in the pattern where it's all knitting with no stitch pattern (like Row 9 of the Shawl Chart with Repeat I showed you earlier).

Problem 5: "Charts are really small and I have trouble telling the symbols apart. It takes all the fun out of knitting if I have to keep staring at tiny squares!"

I am a low-tech girl and yet I find modern technology really helps me out here.

Solution 5a: If you are knitting from a PDF, your device of choice can zoom in  and out. Consult your manual to see how it's done as it differs from device to device.

Solution 5b: if you are working from a printed book or magazine, you can enlarge the chart using a photo copier (many modern printers come with a scanner/copier that will let you do it from the comfort of your own home - otherwise you can do it at the library or ask at work if it's okay to enlarge a chart using the office equipment). By enlarging the chart you can also really go to town with highlighters and scribbled notes!

I hope you've enjoyed this four-part series of lace chart tutorials.

Lace Charts 1 – The Anatomy of a Lace Chart Lace Charts 2 – How to Read a Basic Chart Lace Charts 3 – How to Read a Shawl Chart Lace Charts 4 - Chart Tricks & Knitting Hacks

Thank you! Kx


Tutorial: Lace Charts 3 - How to Read a Shawl Chart

I like my patterns to be inclusive, so I try to offer them with both written and charted instructions. However, sometimes (like the Mahy shawl) a chart is the best way of offering concise and precise information. I know many people don’t like charts, but I hope this series of tutorials will go some way to demystify charts and explain how to use them.  So, we've had a look at the anatomy of a lace chart and how to read a basic chart. Today I'll take a look at a slightly more complex chart that adds extra stitches as well as mysterious "no stitches".

Lace Chart_no_WS

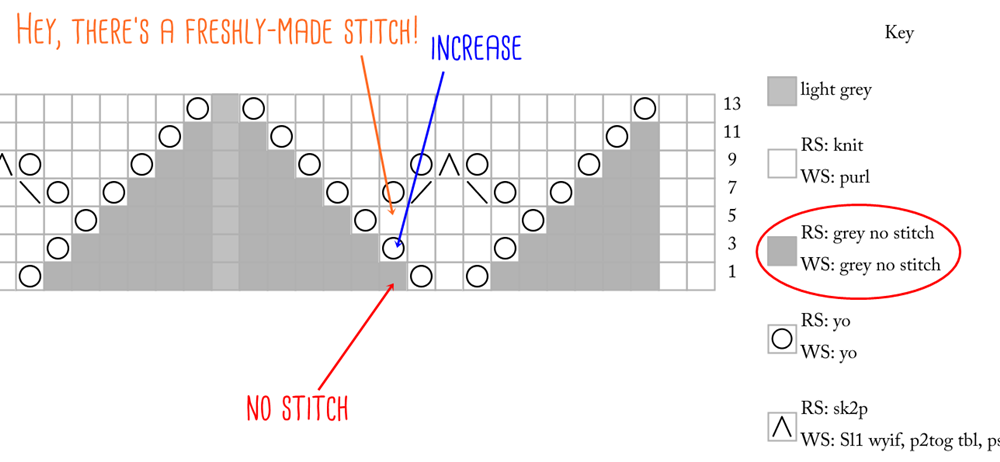
We had a look at this in the first tutorial. But there was one thing I left out that you may or may not have seen in charts: "No Stitch" symbols. Basic Chart_no WS_hiddenitemsshown

The "No Stitch" symbol is inserted because charts are essentially a 2D grid of a 3D object. Because we make stitches in that position later on, we need the grid to reflect that. To wit:

Basic Chart_no WS_hiddenitemsshown_explanation

I like to hide "No Stitch" squares in my chart because I find they cause more confusion than they are worth. As a knitter, all you need to know is that these "No Stitch" squares are actions that do not exist yet. Skip them. You are yet to make them.

So, let's go back to the lace chart where the "No Stitch" squares have all vanished into thin air. Let's figure out how to follow this one.

Lace Chart_no_WS

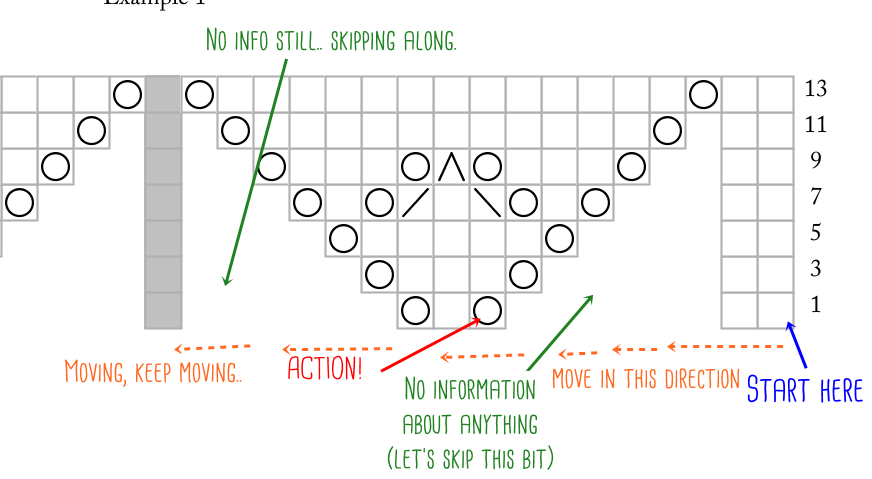
Step 1: Look for the row number. You start with Row 1. Step 2: Work in the direction you are working the stitches. On RS rows, work from right to left. On WS rows, work from left to right. Step 3: Each square represents an action you must take. Mostly you end up with a single stitch on your needle as the result of your action, but keep checking your chart key for information! Step 4: If you cannot see a square or if the square is indication as "No Stitch", you skip to the next action you can see. Step 5: If information isn't visible (i.e. you cannot see WS rows on the chart), check the pattern for instructions.

Keeping all this in mind, you might start looking at the chart like this: Basic Chart_no WS_reading

This post is part of my Lace Chart tutorial series:

Lace Charts 1 – The Anatomy of a Lace Chart Lace Charts 2 – How to Read a Basic Chart Lace Charts 3 - How to Read a Shawl Chart Lace Charts 4: Chart Tricks & Knitting Hacks

Next time we will look at chart comprehension hacks and how to customise your charts. That will be the last chapter, so keep your questions coming either here or via social media. Kx


Tutorial: Lace Charts 2 - How to Read a Basic Chart

I like my patterns to be inclusive, so I try to offer them with both written and charted instructions. However, sometimes (like the Mahy shawl) a chart is the best way of offering concise and precise information. I know many people don’t like charts, but I hope this series of tutorials will go some way to demystify charts and explain how to use them.  This post is about how to read a basic chart. The chart is very straightforward - no shaping and no extra stitches being added. If you like this stitch pattern, you may enjoy my Florence scarf (it's free and only takes one ball of fluffy yarn).

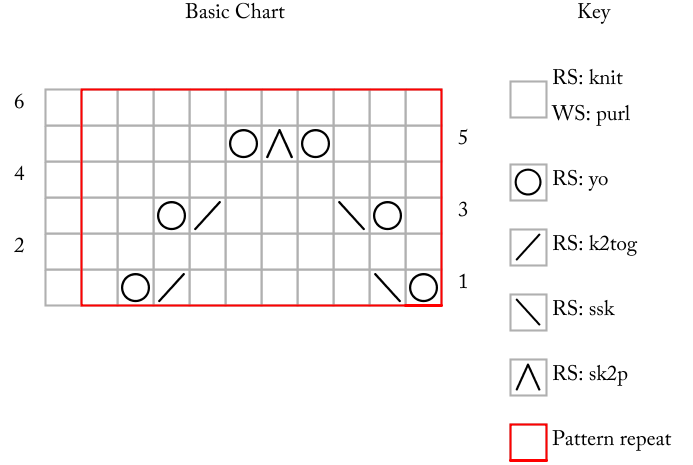
Basic Chart

Reading a chart can be really daunting. Unfortunately chart symbols are not standardised and so you need a key which explains what the various symbols mean. Always check the key to make sure you know what the symbols mean. 

Tip: If you find it hard to remember what the various symbols mean, or if you keep mixing up two symbols, make a copy of the chart and assign a colour to each symbol. Grab highlighter pens and start colouring in the chart. It's a nice little brain-hack.

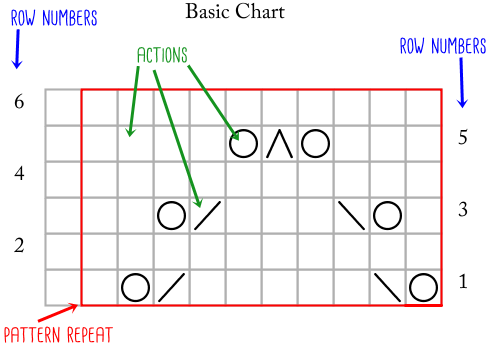
Basic Chart_actionsand layout

Now let's look at the chart itself.

Row numbers are important because they tell you which is the RS and the WS rows. RS rows have numbers on the right-hand side. WS rows have numbers on the left-hand side. We'll come back to why this is important in just a second!

Pattern repeats are outlined. Normally the outline is red, but you may come across a fat, black line being used if the pattern is provided in black & white. The outline is exactly the same as the repeat from *.. you are used to from written instructions. In this case, you can see this is a 10-stitch/6-row repeat. You repeat the ten stitches over and over, until you finish with one stitch (the one outside the repeat).

Action is how I think of a square in a lace chart. Each square represents an action you must take when you get to that stage. Many people think that each square represents a stitch, but sometimes you work more than one stitch per square or do not work a stitch at all. A right-slating line means you are knitting two stitches together; a V (not represented) typically means you are slipping a stitch from one needle to another.

When you work a lace chart, you move from one action to another. One of the biggest advantages of a chart is that it shows you how actions stack on top of one another, creating a stitch pattern. The visual mimicry of the chart symbols often mean your fabric will resemble the chart!

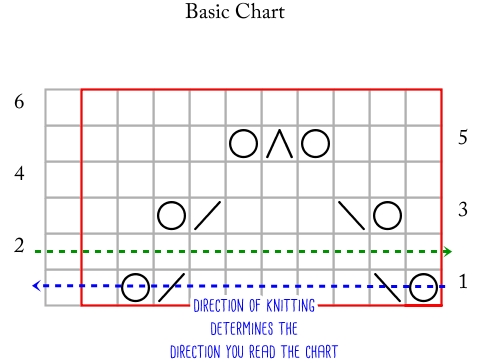
basic chart_direction

The two biggest problems of reading a lace chart is A) where to start and B) how to know which direction you read the actions. Many people think you start by reading a chart like you'd read a piece of English-languaged text: top left and reading left to right. This is incorrect. And this is where we go back to talking about row numbers because row numbers are your friends.

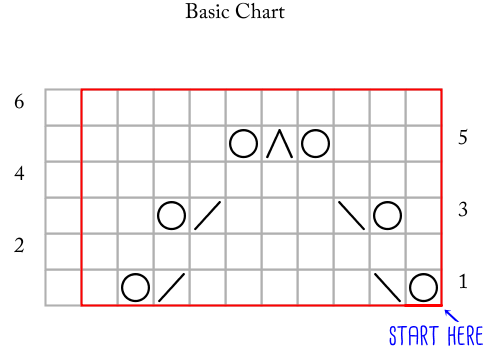
A chart mimics the knitted fabric and your first row will therefore always be at the very bottom. The row number shows that you start at the right-hand side and work your way left. This corresponds with how you work the stitches too: you move your stitches from the left-hand needle to the right-hand needle. When you work the WS rows, you will have turned your work, so you need to turn/revert the direction in which you are reading the actions. Again, the row numbers are your anchors as they will show you where the given row starts!

So in short:

Basic Chart_starthere

This post is part of my Lace Chart tutorials.

Lace Charts 1 - The Anatomy of a Lace Chart. Lace Charts 2 - How to Read a Basic Chart Lace Charts 3 - How to Read a Shawl Chart Lace Charts 4: Chart Tricks & Knitting Hacks

Hope you found this useful! Next time we'll be looking at how to deal with 'no stitches', shaping, and how to customise your lace chart reading. As always, comments and questions are welcome! Kx

Tutorial: Lace Charts 1 - The Anatomy of a Lace Chart

I like my patterns to be inclusive, so I try to offer them with both written and charted instructions. However, sometimes (like the Mahy shawl) a chart is the best way of offering concise and precise information. I know many people don't like charts, but I hope this series of tutorials will go some way to demystify charts and explain how to use them.  This first post is about the anatomy of a lace chart and what decisions go into making a chart as easy to read & use as possible.

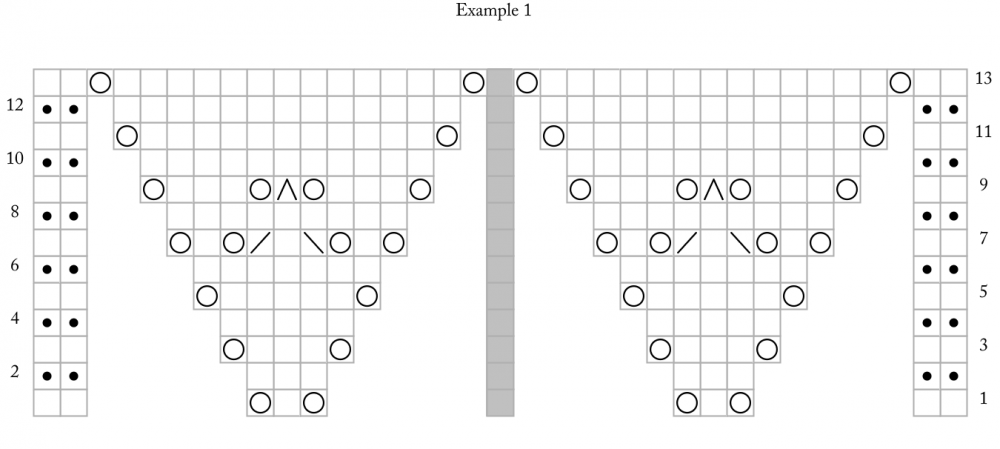
Here's a mock-up of a chart showing the beginning of a triangular shawl.

Lace Chart

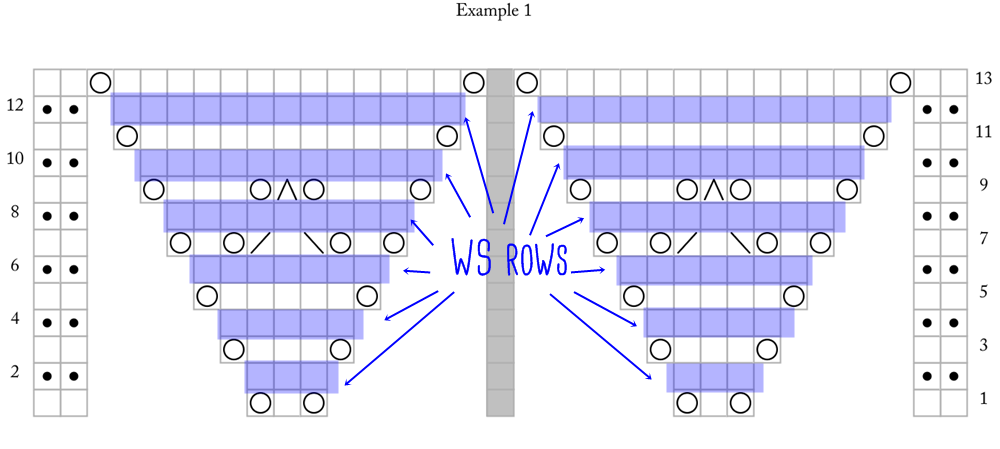
There is a lot of redundant information here. Look closely and you'll see that all the even-numbered rows are telling you to k2, purl across, k2. Those are the WS rows.

Lace Chart - annotated WS

To stop your eye being bombarded with repetitive and redundant information, these rows are hidden. I would then add a note to the pattern itself: "Work all WS rows as follow: k2, purl across, k2"

The chart would then look like this:

Lace Chart_no_WS

That's better. Without distracting WS rows that tells you the same thing again and again, it's far easier to see the odd-numbered rows (RS) where you will be working a pattern.  Hang on, there is more redundant information.

Lace Chart_no_WS_edgecentre

Due to the construction of a standard triangular shawl,  you are doing four things again and again. We've already discussed the first (WS rows), so let's look at the other three. The second thing you keep doing is knitting the first two stitches of every row. The third thing you do is to knit the centre stitch. The fourth thing is to knit the last two stitches of every row.

But there is a fifth instance of repetition in this chart. Have you spotted it?

Lace Chart_no_WS_edgecentreactionsThe chart has you repeating the same stitch patterns after the centre stitch (I will be writing more about this in a later instalment. Note that I am talking about actions in the image- in the next part I will share how you read a lace chart and we'll talk more about actions then).
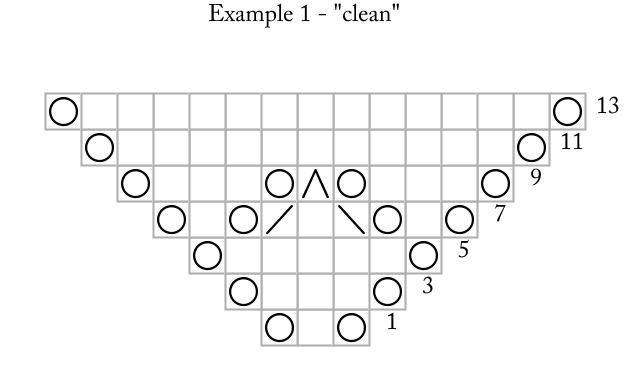
By now you will have twigged that I am a big fan of removing repetitive information. Some patterns work best if I keep the edge stitches, the centre stitch and the two sides of the lace chart - I find the edge stitches and the centre stitch particularly useful as anchors - but other patterns are so full of information, that I want to leave out all the repetitive actions. It depends upon who the pattern is aimed at - easy shawls will have more anchors and complex shawls far fewer.

And so for complex shawls I'd add in-depth notes:

  • Work all WS rows as follow: k2, purl across, k2
  • All rows begin and end with k2 (edge stitches)
  • Remember to work the centre stitch forming the spine between the two sides of the shawl.

And so the chart ends up looking like this:

Lace Chart_clean

This post is part of my Lace Chart tutorial series:

Lace Charts 1 - The Anatomy of a Lace Chart Lace Charts 2 - How to Read a Basic Chart Lace Charts 3: How to Read a Shawl Chart Lace Charts 4: Chart Tricks & Knitting Hacks

If you found this post complex, don't worry! We are going back to basics next time where I'll show you how to read a lace chart! As always, please do leave comments! Kx

Tutorial: Creating a Magazine Submission

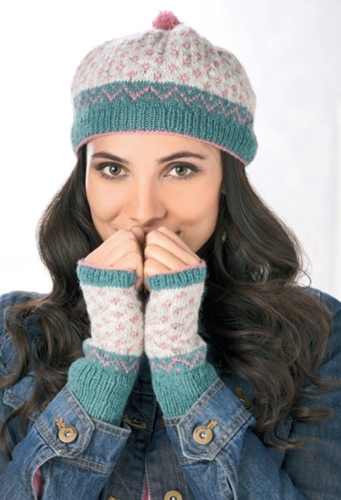
Last year I was lucky enough to get a glimpse into how Sarah Hatton curated The Knit Generation for Quail Publishing and Rowan Yarns. I have also recently helped curate a collection for a knitting company and worked closely with a couple of editors on a sub call. So, in light of all that, I thought it might be interesting to show you one of my successful submissions and discuss in detail how I put together a magazine sub. I don't pretend to have all the answers, of course, but hopefully my experience will be of some help. Recently my Tula hat & gloves set made the cover of UK knitting magazine Let's Knit. The set looks like this (photo courtesy of Let's Knit): karie hat #1

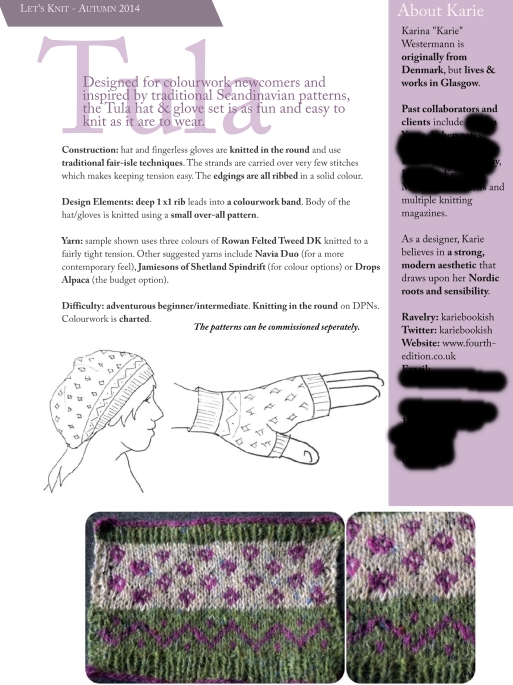
Now let's look at my original submission to the magazine.

tula

Let's dissect the sub.

tula-crop1-2

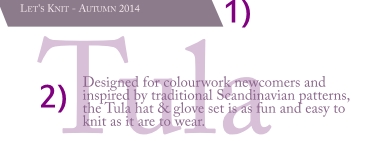
1) I personalised the sub by adding the name of the magazine. Occasionally magazines will give you "stories" or moodboards they want you to use. If that's the case, I will usually add the name of the relevant moodboard to signal that I have thought about my design in a particular context. Let's Knit didn't give me a moodboard to work from, just general guidelines.

2) The name is short, easy to spell and relevant.  I wrote a brief note about the design/design inspiration. I always try to do this in one or two sentences. This brief note should tell the editor(s) exactly what they are looking at.

Next, the details that tell the editors I have thought through the design and who it will appeal to.

tula-crop-3-6

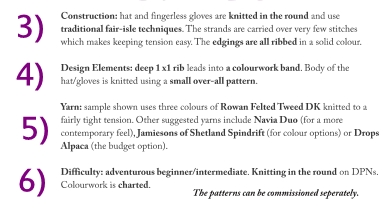
3) The section on construction is very important to tech editors. They will look at whether the designer has thought through the actual making of the piece(s). Nobody wants to commission a piece which the designer realises is impossible to make three weeks before deadline.

4) Depending upon the type of swatch and my lead-in sentences (2), I sometimes skip the design elements. However, it is useful to give an actual description of the piece(s) and this will help the editors when writing about the piece in the magazine as they may not have photos of the item handy when they write about them.

5) The yarn suggestion section is often really fun to compile, but I make sure the yarn suggestions are a) available in the country of the publication, b) they are current yarns and c) they are relevant to the actual project (i.e. not just stuff I think it'd be fun to use). My Tula swatch was knitted in Rowan Felted Tweed which has beautiful drape and comes in 29 colours. It is a sportweight which meant I could actually dip into 4ply or light DK when  it came to making substitutions. I selected Jamiesons of Shetland Spindrift (4ply) and Drops Alpaca (sportweight) as possible substitutions - both have beautiful drape and great colour ranges. Let's Knit loved my idea of using Jamiesons - and I loved using it. Note that I am not making any colour suggestions! The editors often work to colour stories and will liaise with me to make sure my design fits into their stories.

6) Difficulty level simply shows that I have considered who might want to knit my design. Tula is charted and is knitted in the round - this coupled with gentle colourwork says that it will not appeal to absolute beginners but may be an aspirational knit for adventurous beginners or intermediate-level knitters. Again, I am also considering the publication and its target audience. Knitters are not a homogeneous bunch nor are magazines!

tula-crop7

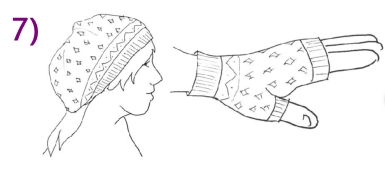
7) Sketch of fit. I want this to show how the hat sits on the head of the wearer and the shape of the fingerless mitts. I know sketching is hard for some people, but you can trace fashion models (like this tutorial tells you) and there are many free tracing models out there.  The more you practice, the better you will get. Remember: if doesn't matter if your model only has three fingers and she squints if your sketch communicates how a hat fits!

tula-crop8

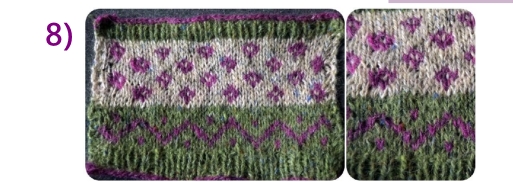
8) However, the swatch is very, very important. The swatch is where the entire story is told, really. My swatch needs to be relatively big (4" by 4" or preferably bigger), blocked, and incorporating all the important elements. Here you can see Tula's one-row cast-on and cast-off in a contrast colour, the 1x1 rib and both colourwork patterns (and how they call back to each other). The photo was taken in daylight near a window (so all details are clear) and I photographed the swatch on a neutral background. Sometimes I take a series of photos of details like beading or a particular stitch pattern and I put them next to the main photo - but only if they are important to the story. tula-crop9a 9) Finally, the bit where I tell editors about me. Quick intro to my background, a paragraph about clients and collaborators, a note about my personal design aesthetic, and finally how the editors can get hold of me including my home address so the editors can send me yarrrrn.The design is way more important than me, so I'm in the margins!

(I know not everybody has a portfolio full of client and collaborators - but I think of the Ravelry project page as an online portfolio (I got my first big break in the knitting industry after someone had seen my project page, actually) and I always check out what people have been knitting. Someone may not have many designs to their names but they may have a project page full of stunning work where they reveal a real sense of colour.)

I spell-check before turning my single A4 page into a PDF (I don't want to write nkitting and nedles - tech editors will worry I cannot format a pattern!). Note that I have chosen to use colours in my layout - I change these colours for every sub I compile so they reflect the colours used in my swatch. Partly it's because I am OCD about colour but also partly because my choice of colour/layout is part of the story I am telling with my sub. You can also see I choose to semi-bold keywords which makes life easier for a busy editor.

And there you have it - the sub I compiled for Tula. I hope this has been useful in showing you just how much information I try to  include and how I try to make the editors' decision-making easier. This is definitely not the only or right way of making a submission - remember you want to be telling your own story in your own voice!

However, if you have any questions, please do ask and I'll compile/answer them in a future post.

Basic Tutorial: Dyeing Yarn with Cake Paste Dye

There are various methods you can use to dye your own yarn or project. You can handpaint hanks of yarn, microwave your dyeing project or use a big stove top pot. For actual hanks of yarn, I prefer the stove top method, but if I am dyeing actual projects, I use my oven. My Modus Operanti for (over)dyeing shawls:

I use the basic methods outlined in the links above, but opt for a cake icing dye paste which I bought in a local cake decorating shop. The paste is so concentrated that I need to use only a small amount to dye an entire shawl, thus making it a more economical choice than, say, Kool-Aid (at least if you are in the UK) or commercial food dyes available in your local supermarket. The icing paste also comes in a gazillion colours and you can mix/match to your heart's delight.

For my Echo Flowers Shawl I used half a teaspoon of paste which I dissolved with boiling water and I added citric acid as a mordant. Most dyers use vinegar as it is easier to obtain, but I happened to have some leftover citric acid from some lemonade making. The rest of the dyeing process was straight-forward and I am still very happy with the result.

Completely unrelated: how amused am I to try my hand at Quizlet and getting a B- (75%) score on my Danish language skills? I guess that is what I get for spelling words correctly instead of imitating the quiz master's spelling mistakes. Lumosity is a much better way of wasting time online in an educating and self-improving manner.

And headcold has turned into a real cold. I apologise in advance to anyone meeting me off-line in the next few days. I look and sound like I'm on the edge of death.